How does it work?
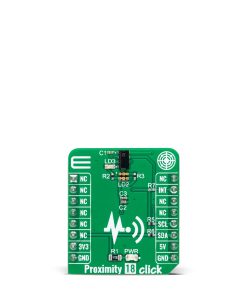
Proximity 18 Click is based on the VCNL3036X01, a close-range digital proximity sensor from Vishay Semiconductors. The VCNL3036X01 integrates a proximity sensor, a mux, and a driver for three external LEDs (green LED VLMTG1300 and dual-pack IR and Red LED VSMD66694) located near the chip on the board, alongside photodiodes, amplifiers, and analog to digital conversion circuits into a single CMOS chip. Proximity 18 Click provides absolute distance measurement that is accurate up to 50cm.
The VCNL3036X01 supports various basic proximity function settings such as duty ratio, integration time, interrupt, proximity enable, disable, and persistence, all handled by the register configurations. Besides Normal operation mode, it also simplifies the use of proximity detection logic output mode that outputs HIGH / LOW levels, saving loading from the host selected via register settings.
Proximity 18 Click communicates with an MCU using the standard I2C 2-wire interface to read data and configure settings, supporting Fast Mode up to 400kHz. The command register controls all operations. The simple command structure helps users to easily program the operation setting and latch the light data from VCNL3036X01. It is simple for the host MCU to access proximity output data via the I2C interface without extra software algorithms.
A further benefit is that the VCNL3036X01 also provides a programmable interrupt feature of individual high and low thresholds, resulting in the best utilization of MCU resources and power, routed to the INT pin on the mikroBUS™ socket. If the interrupt function is enabled, the host reads the proximity output data from VCNL3036X01, which saves the host loading from periodically-read proximity data. More than that, an interrupt flag indicates the interrupt behavior triggered under different conditions. Once the host reads the result, the interrupt is cleared, and the ranging sequence can repeat.
This Click board™ can operate with both 3.3V and 5V logic voltage levels. It should be highlighted that the VCNL3036X01 works exclusively at 3.3V, so it is necessary to perform appropriate logic voltage level conversion before using MCUs with different logic levels. 5V is used only for powering the LEDs. However, the Click board™ comes equipped with a library containing functions and an example code that can be used, as a reference, for further development.
Specifications
Type
Proximity
Applications
Can be used for proximity/optical switch applications for consumer, computing, automotive, and industrial purposes
On-board modules
VCNL3036X01 – close-range digital proximity sensor from Vishay Semiconductors
Key Features
Fast and accurate distance ranging sensor, fully integrated module, low-power consumption, I2C interface, programmable interrupt, up to 500mm ranging, various basic proximity function settings, and more
Interface
I2C
Feature
No ClickID
Compatibility
mikroBUS™
Click board size
S (28.6 x 25.4 mm)
Input Voltage
3.3V,5V
Pinout diagram
This table shows how the pinout on Proximity 18 Click corresponds to the pinout on the mikroBUS™ socket (the latter shown in the two middle columns).
Onboard settings and indicators
Label | Name | Default | Description |
---|---|---|---|
LD1 | PWR | – | Power LED Indicator |
LD2 | LD2 | – | IRLED Emitter |
LD3 | LD3 | – | Green LED Emitter |
Proximity 18 Click electrical specifications
Description | Min | Typ | Max | Unit |
---|---|---|---|---|
Supply Voltage | 3.3 | – | 5 | V |
Operating Range | – | – | 500 | mm |
Spectral Bandwidth Range | 500 | – | 910 | nm |
Red LED Wavelength | – | 660 | – | nm |
IR LED Wavelength | – | 940 | – | nm |
Green LED Wavelength | – | 525 | – | nm |
Resolution | – | – | 16 | bit |
Operating Temperature Range | -20 | +25 | +85 | °C |
Software Support
We provide a library for the Proximity 18 Click as well as a demo application (example), developed using MikroElektronika compilers. The demo can run on all the main MikroElektronika development boards.
Package can be downloaded/installed directly from NECTO Studio Package Manager(recommended), downloaded from our LibStock™ or found on Mikroe github account.
Library Description
This library contains API for Proximity 18 Click driver.
Key functions
-
proximity18_start_measurement
This function starts the measurement by setting the one time trigger bit in the PS_CONF3_MS register. -
proximity18_wait_for_data_ready
This function waits for the MPX data ready interrupt flag. -
proximity18_read_proximity
This function reads the proximity data from all 3 sensors.
Example Description
This example demonstrates the use of Proximity 18 Click board™ by reading and displaying the proximity data on the USB UART.
void application_task ( void )
{
uint16_t ps1_data, ps2_data, ps3_data;
if ( PROXIMITY18_ERROR == proximity18_start_measurement ( &proximity18 ) )
{
log_error ( &logger, " Start measurement." );
Delay_ms ( 5000 );
}
if ( PROXIMITY18_ERROR == proximity18_wait_for_data_ready ( &proximity18 ) )
{
log_error ( &logger, " Wait for data ready." );
Delay_ms ( 5000 );
}
if ( PROXIMITY18_ERROR == proximity18_read_proximity ( &proximity18, &ps1_data, &ps2_data, &ps3_data ) )
{
log_error ( &logger, " Read proximity." );
Delay_ms ( 5000 );
}
else
{
log_printf ( &logger, " PS1 data: %urn", ps1_data );
log_printf ( &logger, " PS2 data: %urn", ps2_data );
log_printf ( &logger, " PS3 data: %urnn", ps3_data );
}
Delay_ms ( 1000 );
}
The full application code, and ready to use projects can be installed directly from NECTO Studio Package Manager(recommended), downloaded from our LibStock™ or found on Mikroe github account.
Other Mikroe Libraries used in the example:
- MikroSDK.Board
- MikroSDK.Log
- Click.Proximity18
Additional notes and informations
Depending on the development board you are using, you may need USB UART click, USB UART 2 Click or RS232 Click to connect to your PC, for development systems with no UART to USB interface available on the board. UART terminal is available in all MikroElektronika compilers.
mikroSDK
This Click board™ is supported with mikroSDK – MikroElektronika Software Development Kit. To ensure proper operation of mikroSDK compliant Click board™ demo applications, mikroSDK should be downloaded from the LibStock and installed for the compiler you are using.
For more information about mikroSDK, visit the official page.